A mini twist on my all-time favorite (and best ever) artisan bread recipe. Super crusty, fluffy, and so easy! Just 3 ingredients and 5 minutes of prep. Use these mini loaves as sandwich rolls, or toast and add toppings for cute crostini.
For more delicious recipes and a coupon for $1.00 off any product, please visit BobsRedMill.com!
I often change up what’s on the menu at home, just to keep exploring new flavors and trying new tastes. However, one recipe that remains on weekly repeat is my phenomenal (is that okay to say?) No-Knead Artisan Crusty Bread. It is truly one part recipe, one part magic trick.
Every. single. time. that I’ve baked it, the crust has come out light and crisp, with fluffy, pillow soft nooks begging to be buttered! We’ve served slices on the side of soups, salads, roasts, and just about any meal you can think of. And it makes a killer sandwich bread, of course.
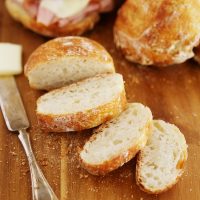
But, enough about the daddy loaf, I’m here to tell you how to bake an even better crusty bread – but a bit smaller. Because then you might want to share. And sharing is caring. And mini is marvelous.
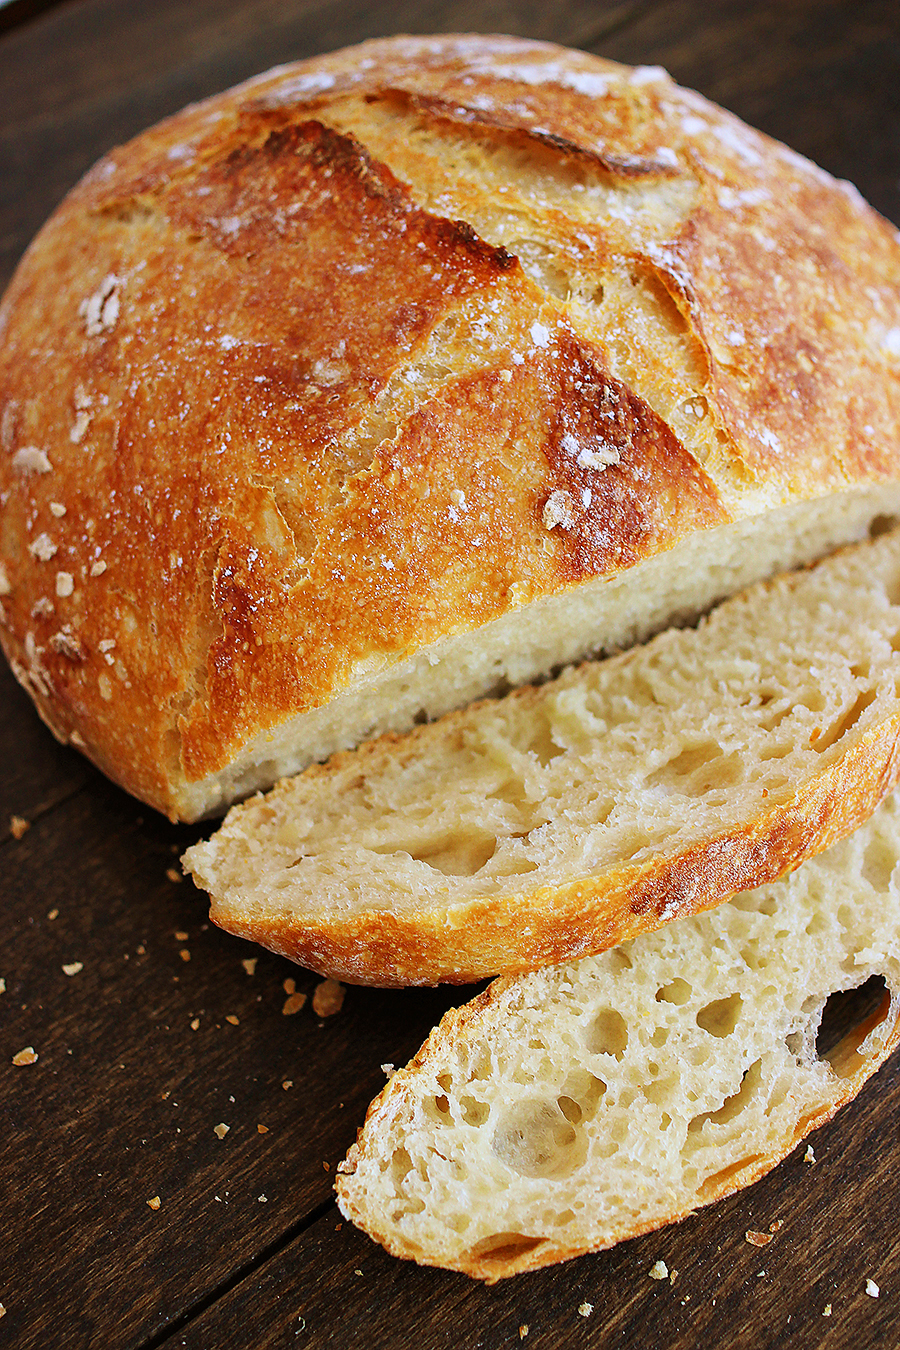
Here is the recipe for the full-sized loaf, pictured above. Which, let’s be honest, is absolutely dreamy with a dab of salted butter, or piled with bruschetta toppings. Or really, any way you slice it.
But today, I’m going to teach you how to change up the baking method slightly to get perfectly round, crusty little balls of bread with soft and fluffy insides. With three ingredients. No fancy gadgets or funny tricks. And no kneading.
Just baking. And slicing. And buttering. And devouring.
The ingredients are simple – flour, salt, yeast and a cup and a half of warm water. Minimal but quality is key. I’m often asked which flour brand works best, and my answer is always Bob’s Red Mill Unbleached White All-Purpose Flour, a longtime favorite. It bakes up beautifully golden brown, fluffy artisan loaves every time. And, of course, what’s not to love about a good quality all-purpose flour? It is so versatile for use in cookies, cakes, muffins, quick breads, pie crusts, pizza crusts, and thickening sauces. I use this organic flour for everything.
Now, let me show you a little in-process action!
The top photo is what your dough should look like before rising – gently mixed but messy, shaggy and piecey. That’s what will get you those big air pockets (for melted butter to slip into, remember?). Don’t overwork it, now. The less you touch it, the more air pockets will form. That’s the beauty of a no-knead bread!
Cover it tightly with plastic wrap and throw a clean dish towel over top. Then patiently wait 8+ hours for it to rise. The waiting is the hardest part.
This one rose for 12 hours. Though it may not look super fluffy in the second photo, that’s just where you want it! Still a bit messy but softer. When you dump it onto a floured surface, it will be a little wet. Gently mold it into a cohesive, round ball. Then divide the dough ball into 6 pieces (a pastry cutter helps with this), then bake as directed.
Prepare yourself for the “OMG DID I REALLY JUST BAKE THAT” moment as you pull your perfect bread from the hot oven.
I love giving these mini loaves away as gifts, serving them as rolls, and piling them high with meats, cheeses and veggies for sandwiches and sliders.
You can even flavor them up with dried herbs, ground spices, citrus zests and shredded Parmesan. Just mix them into the dry flour mixture, before adding the water and rising.
I hope you have fun with this awesome homemade artisan bread. I know you’ll love these loaves, made full sized or mini. If you give them a try, please let me know how they turn out for you!
Craving more? Keep in touch on Facebook, Twitter, Pinterest and Instagram for new post updates and more. You can also check out my FAQ page, or contact me with any questions or inquiries!

No-Knead Crusty Artisan Mini Loaves
Yield: Makes about 6 mini loaves
Ingredients:
3 cups all-purpose flour
2-3 teaspoons kosher salt (not table salt)
1/2 teaspoon dry yeast (active dry or highly active dry work best)
1 1/2 cups warm water
Special cookware needed: Dutch oven or any large oven-safe dish/bowl and lid*
Directions:
In a large bowl, stir together the flour, salt and yeast. Stir in water using a wooden spoon until the mixture forms a shaggy but cohesive dough. Do not over-work the dough. The less you "work" it, the more soft, fluffy air pockets will form.
Cover bowl tightly with plastic wrap. Let dough sit at room temperature for 8-24 hours*. Dough will bubble up and rise.
After dough is ready, preheat oven to 450 degrees F. Place your Dutch oven (or other large baking dish), uncovered, into the preheated oven for 30 minutes.
While your Dutch oven preheats, turn dough onto a well-floured surface. With floured hands, form the dough into a ball. Divide into 6 equal-sized pieces and gently form into round balls. Cover dough loosely with plastic wrap and let rest.
After the 30 minutes are up, carefully remove Dutch oven. With floured hands, place dough balls into it. (You can put a piece of parchment under the dough if your Dutch oven isn’t enamel coated.)
Replace cover and bake for 30 minutes covered. Carefully remove cover and bake for 7-15 minutes* more, uncovered.
Carefully remove loaves to a cutting board. Use for crostini, sandwich buns, or garlic bread!
Enjoy!
NOTES
Uncovered baking time depends on your oven. In my oven, the loaves only need 7 minutes uncovered until crusty and golden brown, but this can vary. Just keep an eye on it!
Heating your Dutch oven to 450 degrees F will not damage it, or the knob on top.
I’ve let this dough rise anywhere between 8-24 hours and it has baked up beautifully. Just make sure it has risen and appears to “bubble” to the surface.
There’s no need to grease the Dutch oven/baking dish/pot. My bread has never stuck to the pot. If you are concerned though, put a piece of parchment paper under your dough before placing into your pot.
I do not recommend using whole wheat flour or white whole wheat flour in this recipe. The resulting bread will be very dense, and not as fluffy and delicious.
I used a 5.5 quart enameled cast iron Le Creuset pot, but you can use any large oven-safe dish and cover. All of these also work: a baking dish covered with aluminum foil, crockpot insert, stainless steel pot with a lid, pizza stone with an oven-safe bowl to cover the bread, and old cast iron Dutch oven.
Add any mix-ins you like - herbs, spices, dried fruit, chopped nuts and cheese all work well. I recommend adding them into the initial flour-yeast mixture to avoid over-working the mix-ins into the dough. The less you "work" it, the more you're encouraging soft, fluffy air pockets to form!
Disclosure: This is a recipe created for Bob's Red Mill. I was compensated for my time but all opinions are my own.
For more delicious recipes and a coupon for $1.00 off any product, please visit BobsRedMill.com!
Kristine @ Kristine's Kitchen says
I can’t believe these mini loaves only take 3 ingredients and are so easy to make! They ARE just begging to be buttered! I can’t wait to try them. ;)
Eileen says
Oh Georgia, I am so going to try this recipe!
Elisa says
I’ve always been looking for a recipe like this! As much as I love to have a big loaf to serve when I have multiple guests to feed, mini loaves are a lot more versatile for our family of three and…let’s admit it, mini always looks cuter, right?! These would be perfect for so many recipes and sandwiches, I can’t wait to try them out. I’ve always been a bit intimidated by bread, because it always looked kind of difficult to make, but yours look super easy and quick! Fingers crossed :)
Kitchen Belleicious says
okay now that is one of the easiest bread recipes I have seen! i so must do this. I love the rustic take to the bread and you could have this with almost any dish!
Noelani Hatton says
I swear by this recipe! My husband and I have been your recipe for the large loaf of this bread for a while now. We are in LOVE with it! We often use it to accompany spinach artichoke dip for parties :) I can’t wait to try the mini version. Going to start my batch tonight!
Georgia — March 31st, 2015 @ 2:49 pm
Ooo, I love the idea of using it as a dipping bread!
Shawn @ I Wash You Dry says
I love the mini loaf idea. They are much easier to serve, and so great for bruschetta. I also like the crusty edges, they’re my favorite!
Bianca @ Confessions of a Chocoholic says
Phenomenal is the right word! These look beautiful. Pinning!
Jules @ WolfItDown says
Three ingredients = success! These rolls look soooo tasty! Thank you for sharing :D x
Erin@WellPlated says
I’ve made that beautiful bread recipe before (LOVE), but I never thought to turn it into mini loaves. What a great idea, and they really are perfect for gifts too!
Julie says
This looks so easy (and delicious) it almost makes me want to bake bread.
Gaby says
Wow! This is a fantastic recipe, these cute little loaves look incredible!!!
Ramona says
I would love to just slather those all with some butter and dig in. :)
Kayle (The Cooking Actress) says
OBSESSED. I am totally going to make these gorgeous mini loaves!!
mad sad says
I swear by this recipe! My husband and I have been your recipe for the large loaf of this bread for a while now. We are in LOVE with it! We often use it to accompany spinach artichoke dip for parties :)
Darlene says
did you bake the mini rolls on a sheet pan, uncovered or in a covered Dutch oven?
Georgia — July 30th, 2015 @ 11:12 am
I have baked these before both on a sheet pan and in a Dutch oven. As the recipe states, you first bake them covered, then uncover.
Diane says
I just finished making your bread——I really do love it. Thank you so much. Could I add walnuts, raisins and cinnamon to my next loaf??? Would it turn out???
Georgia — November 6th, 2015 @ 11:20 am
You can certainly try it! You may also be interested in my Soft Cinnamon Swirl Bread: http://www.thecomfortofcooking.com/2014/11/soft-cinnamon-swirl-bread.html
Toni says
It was so easy making this bread! It’s delicious :)
However, it got pretty hard by the end of the day and this morning it’s almost impossible to bite into it. Any tips for that?
Karen says
I’d be keen to know if anyone’s tried this in mini loaf tins. Will they still come out crusty? :)
Calli says
I can’t even tell you. I’ve made these so many times. They are my new favorite. I feel so impressive when I serve them to people…and I do homemade bread a lot so it’s not just the novelty. They really are the BEST ever. I’ve had requests for them. I’ve been asked for the recipe and for lessons on making them. I’ve even been blessed for serving these. Ever had them with spinach dip? A-mazing. How about as the roll for a french dip? To die for! I don’t take the time to comment on most the great things I find online. That’s how you know that these are possibly the best reason for the internet to exist.
Calli says
I found that they will turn delightfully chewy if put in a plastic bag. They can even be thrown back in the oven for a few minutes to crisp back up a little if you wanted. Or if you want them to stay crispy, I keep them wrapped tightly in a light cloth. They do still get a little hard though.
Courtney says
These sound amazing!!! Do you think they would still turn out if I substituted for gluten free flour by Bobs Red Mill?
Molly Smith says
I made these yesterday. They were great, although I strongly suggest cutting back on the salt. I used 2 teaspoons of kosher salt and they were on the verge of inedible. But, fortunately I tasted one before cooking the rest of my meal and I adjusted the salt in everything else accordingly so that the complete bite wouldn’t be too salty. That said, the texture was incredible. Also, my dutch oven wasn’t big enough to keep them separate so they all baked together. It meant slightly less crust but they were still delish.
Susan W says
I have been baking all kinds of yeast breads since I was 17 and I’m 60 now. I have made this basic 3 ingredient bread. All basic French baguettes and boules are made from these3 ingredients, as well as Italian country breads. A note to your editor: WHY, as I scroll down through the recipe, certain words that are underscored, “light up”? Might be helpful for a newbie but a tad annoying to one who’s been baking for over 40 years. Do they think we’re idiots?
Bronwyn says
These no knead mini loaves / rolls were super easy to mix simply with a wooden spoon. I only had bread flour, so that is what I used. I wish I could post a picture of my delicious crisp rolls baked in a tiny convection Halogen oven. My first attempt was a huge success so I baked these a few more times.
Thanks for sharing the recipe and detailed instructions.
Please advise whether I can post some pics.
Thanks!
Pam says
If I wanted to divide the dough in half (instead of 6), what would the baking time be? Thank you!
Beth says
How do you cover them if you cook them on a baking sheet, and is it really possible to bake them in a dutch over without them expanding and forming one loaf? Sorry but I’m confused.
Jenni says
Dip your hand in water and rub it on the outside of the bread so the loaf is just slightly damp. Then warm it up in a toaster oven or preheated regular oven. Fixes up hardened bread like magic!!
Regi says
It looks like you cooked them on a sheet pan but then you talk about cooking them in a dutch oven?
I make a large loaf in a dutch oven but how do the rolls not stick together?
Eliza says
I had the same question! Do you cover it with foil on a baking sheet?
Sara says
One thing I would recommend is to heat the cover of the baking vessel along with the vessel itself. And then bake it with the lid on for the first 30 minutes. It makes the crust crispy and even more awesome. I love this recipe and make it all the time. Thanks so much!
Anne says
Do these freeze and reheat well? I need a make-ahead recipe for this weekend.
Sarah says
I’m also confused – the instructions say use a Dutch oven but the photos are of a baking sheet. I think the rolls would stick together to form a loaf if you bake them in a Dutch oven and be less crusty when pulled apart. As another commentor asks: how do you cover them if you bake them on a baking shee? Thanks.
human extensions blend says
Hello there, just became aware of your blog through Google,
and found that it’s really informative. I’m going to watch out for brussels.
I’ll appreciate if you continue this in future.
Lots of people will be benefited from your writing. Cheers!
bigger butt says
I’ve learn several just right stuff here. Definitely price
bookmarking for revisiting. I surprise how a lot effort you set to create any such magnificent informative website.
traveling wilburys says
I like it when people get together and share thoughts.
Great website, keep it up!
singlecoilsound.com says
I was more than happy to find this great site. I wanted to thank you for your time
due to this wonderful read!! I definitely appreciated every part
of it and I have you saved to fav to check out new stuff on your blog.
Cameron says
I used to be suggested this blog by my cousin. I
am no longer positive whether this submit is written by way of him as nobody else realize such specific approximately my problem.
You’re amazing! Thank you!
163.22.51.138 says
I read this paragraph completely on the topic of the difference of hottest and earlier technologies, it’s awesome article.
traveling jobs says
Pretty section of content. I just stumbled upon your website and in accession capital to assert that I acquire actually enjoyed account your blog posts.
Any way I’ll be subscribing to your feeds and even I
achievement you access consistently quickly.
http://www.newportucc.org/UserProfile/tabid/61/userId/1847677/Default.aspx says
Truly when someone doesn’t understand then its up to
other users that they will help, so here it happens.
cause fatal heart says
Why users still make use of to read news papers when in this technological globe everything is available on web?
http://laoindustry.com says
Hi, this weekend is good in favor of me, because this time i am reading this wonderful informative paragraph here at my
home.
resources.alunar.net says
It’s difficult to find educated people for this topic, but you
sound like you know what you’re talking about! Thanks
Dorcas says
Post writing is also a excitement, if you be familiar with then you
can write if not it is complex to write.
custom soccer jerseys says
Hello there I am so thrilled I found your weblog, I really found
you by mistake, while I was looking on Yahoo for something else, Regardless I
am here now and would just like to say thanks for a
marvelous post and a all round interesting blog (I also love the theme/design), I don’t have time to go through
it all at the minute but I have bookmarked it and also included your RSS feeds, so when I have time I will be back to read
much more, Please do keep up the fantastic work.
Gilda says
Generally I don’t learn post on blogs, however I would like to say that this write-up very forced me to try and do it!
Your writing taste has been surprised me. Thanks, very
great post.
www.mingzhoupai.com says
Hi to every one, since I am truly eager of reading this web site’s
post to be updated regularly. It contains pleasant data.